


Headlight polishing set
Q11 brand polishing set especially suitable for headlight polishing, with which you can easily and professionally polish a matte headlight
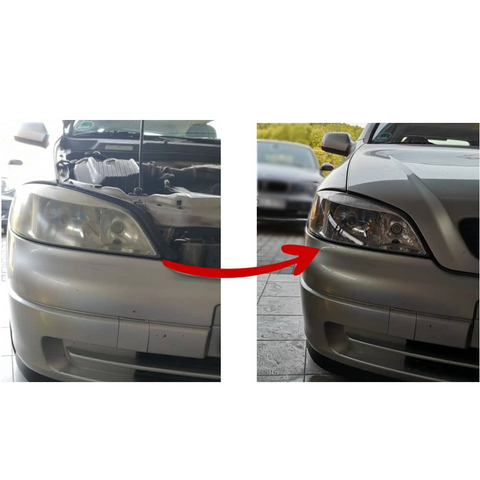
It is easy to use and there are plenty of videos on how to use it
After polishing, the lamps can be made permanently shiny with UV protective liquid, which is also included in the set!
Kit includes:
1 velcro disc with chuck insert.
1 piece of masking tape
2 pieces of 800 grit sandpaper
2 pieces of 1200 grit sandpaper
2 pieces of 2000 grit sandpaper
1 tube of headlight polishing cream
2 pieces of 3 ml UV protective liquid. 1 piece of applicator sponge.
To use it, you will need a cordless screwdriver/drill, water and a clean shaded environment.
Read the user manual before starting the operation: 1. Prepare the necessary tools, water, and the headlight polishing set.
2. Wash the car and the lampshade, after drying, use the masking tape included in the package to cover the painted body parts close to the lampshade.
3. Work on only one lampshade at a time!
4. Place the disc with the black Velcro in the drill, using the rod that fits into the chuck included in the package.
5. The package includes 2 pcs 2000, 2 pcs 1200 and 2 pcs 800 sandpaper. Place 800 of these on the previously used velcro disc so that it does not hang off the surface. Check that it fits properly on the disc.
6. Wet the headlight to be treated with a sponge, then start sanding the surface of the lamp cover, starting from low speed up to medium speed. Never work in one place! Make continuous movements on the surface, otherwise the surface may be significantly damaged or uneven. It continuously replaces the water on the surface. With this operation, he removed old varnish residues and burnt-on dirt. The resulting surface is completely opaque.
7. Switch to 1200 grit sandpaper and repeat step 6.
8. Now switch to 2000 grit sandpaper to smooth the surface.
9. Place the orange polishing disc in the package on the black Velcro disc, then open the STEP 2 blue packaging polishing agent and put a little on the orange disc. Press this against the surface of the lampshade and distribute the material, then turn on the drill, first at a slow speed, then gradually speed up and polish the surface of the lampshade. Move continuously on the surface and hold it firmly, and do not deviate from the surface to be polished! If necessary, replace the polishing cream and polish according to point 9 until the surface is satisfactory.
10. At the end of the operation, wipe the surface with a clean, dry cloth, you can also wash the light source with a sponge, but wipe it dry.
11. After completing the operation, repeat the steps 5-10 on the other lamp cover.
12. Open the STEP 3 (black) UV protective liquid, then apply the protective layer to the already polished and cleaned lampshades with the applicator (white disc-shaped) sponge included in the package. The UV protective liquid hardens under the influence of a UV lamp or sunlight (UV).
13. Drive the car after 24 hours of complete drying. If you start using the car sooner, there is a risk that various impurities will stick to the treated surface.